WordPress speed with htaccess file
Whether you are on a shared hosting or a VPS server, setting up a .htaccess file can have an impact on the optimization of a website and especially on the speed of the latter. In addition to optimizing your WordPress site, the .htaccess file can also allow caching of your site, redirecting a domain name and many other things. This article explains how Optimize the speed of WordPress with a .htaccess file.
How to access the .htaccess file?
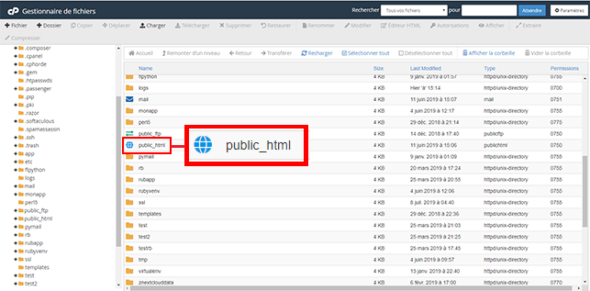
in front of start configuring your .htaccess fileIt is good to know that poor configuration of the latter can affect the operation of your website. Indeed, the file may jeopardize the operation of the latter. With cPanel hosting, the .htaccess file is easily accessible via the file manager found in the “files“From your interface.

Then click on the “public_html“To access the last one.

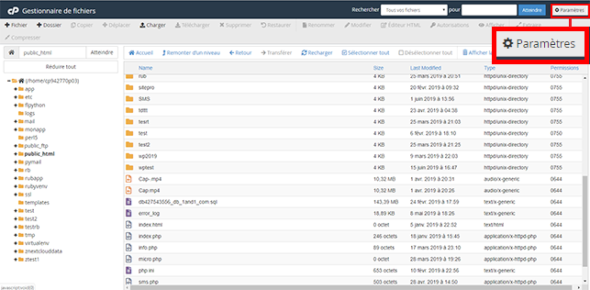
For security measures the .htaccess file is hidden by default. Click on the button to make it visible “Settings” at the top right of your screen.

Check the boxShow hidden files (dot files)“And click on the button”Save“.

How to enable GZIP on your .htaccess file?
Enabling GZIP on your .htaccess file improves the loading speed considerably of your WordPress site. In fact, HTML code compression will reduce the weight of your website. As a result, it will be faster and improve your SEO and help you retain your customers.
Most websites are hosted under Apache. This allows you to activate GZIP with the following lines of code.
# Compression text, html, javascript, css and xml
AddOutputFilterByType DEFLATE text / plain
AddOutputFilterByType DEFLATE text / html
AddOutputFilterByType DEFLATE text / xml
AddOutputFilterByType DEFLATE text / css
AddOutputFilterByType DEFLATE application / xml
AddOutputFilterByType DEFLATE application / xhtml + xml
AddOutputFilterByType DEFLATE application / rss + xml
AddOutputFilterByType DEFLATE application / javascript
AddOutputFilterByType DEFLATE application / x-javascript
Add DEFLATE to your .htaccess file
Mod_gzip and mod_deflate do the same. Indeed, they both allow, compress the data. However, Mod_deflate has more documentation. Moreover, it is often much easier to configure. By adding a code at the level of the .htaccess file of your WordPress site it can be activated:
<ifModule mod_deflate.c & gt;
# Compression text, html, javascript, css and xml
AddOutputFilterByType DEFLATE text / plain
AddOutputFilterByType DEFLATE text / html
AddOutputFilterByType DEFLATE text / xml
AddOutputFilterByType DEFLATE text / css
AddOutputFilterByType DEFLATE application / xml
AddOutputFilterByType DEFLATE application / xhtml + xml
AddOutputFilterByType DEFLATE application / rss + xml
AddOutputFilterByType DEFLATE application / javascript
AddOutputFilterByType DEFLATE application / x-javascript
& Lt; / IfModule & gt;
Perform URL redirect
You can also use the .htaccess fileredirect your domain name without WWW to the domain name with. To do this, simply add a few command lines to your file.
To redirect your URL with WWW to another URL:
RewriteCond% {HTTP_HOST} ^ www  .domain  .com $
RewriteRule ^ /, $ "http :  /  / domain  .com  /" (R = 301, L)
To redirect your site without WWW to the site with WWW:
RewriteCond% {HTTP_HOST}! ^ Www.domain.com $ (NC)
RewriteRule ^ (. *) $ Htp: //wwwdomaine.com/$1 (L, R = 301)
How to enable browser caching?
It is possible for youenable browser caching via your .htaccess file. This will save the files in your visitor’s browser for a certain period of time in the cache. The period and type of files are defined by the command line in the .htaccess file. This allows pages to be loaded via the data stored in the client browser instead of reloading files from the server. The order is mod_expires and works as follows:
ifModule mod_expires.c & gt;
Expires Active On
# Standard expiry date: 1 hour after request
Expires Standard "now plus 1 hour"
# CSS and JS expiration date: 1 week after application
ExpiresByType text / css "now plus 1 week"
ExpiresByType application / javascript "now plus 1 week"
ExpiresByType application / x-javascript "now plus 1 week"
# Image file expiration date: 1 month after request
ExpiresByType image / bmp "now more 1 month"
Expires by image / gif "now more 1 month"
Expires by image / jpeg "now more 1 month"
ExpiresByType image / jp2 "now more 1 month"
Expires by image / pipegype "now more 1 month"
ExpiresByType image / png "now more 1 month"
& Lt; / IfModule & gt;
conclusion
You can now optimize the loading of your site on your WordPress hosting ?
The .htaccess file indeed makes it possible to compress the data. You can also enable client browser caching. Other optimizations can be implemented on WordPress, such as reducing the weight of your images, caching via WP Super Cache and Cloudflare.
And you, how did you optimize WordPress? Feel free to share your experiences la
Discover our WordPress hosting offers and participate ?


Comment
ERR_TOO_MANY_REDIRECTS WordPress: what it is and how to solve it | ?? LuHoster INC
[…] Try to visit your site and make sure the problem is resolved. If this is not the case, click to spend (Edit) on the same file line .htaccess and enter the code below. How to optimized the speed of wordpress via .htaccess? […]